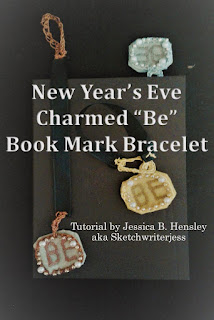
The New Year's Eve Charmed "Be" Book Mark Bracelet, A Classic Accessory that not only can be worn at New Years, but worn all year round!
The color combinations, materials and brands used for each bracelet are...
Offray 5/8” Sheer Black Ribbon and
Darice Venezia 3mm x 4mm Rondelle Crystals color champagne
(Ribbon and Crystals are used for each bracelet)
Bookmark Bracelet Left:
Eco Fi Creatology Felt Sandstone,
Toho 6/0 “E” Beads Galvanized Peach 1952-102,
DMC Perle 5 Cotton#301 MD Mahogany,
DMC Six Strand Floss #356 MD Terra Cotta, and
Darice 6mm Glass Pearls Vintage Pink.
Bookmark Bracelet Center:
Eco Fi Classic Felt Gold,
Toho 6/0 “E” Beads Bright Gold 1952-50,
DMC Perle 5 #725 MD Lt Topaz,
DMC Six Strand Floss #781 V Dk Topaz, and
Darice 6mm Glass Pearls Pink.
Bookmark Bracelet Right:
Eco Fi Classic Felt Silver Grey,
Toho 6/0 “E” Beads Bright Silver 1952-49,
DMC Perle 5 #415 Pearl Gray,
DMC Six Strand Floss #451 Dk Shell Gray, and
Darice 6mm Glass Pearls White.
Tools Used (Brands in parenthesis):
Embroidery Scissors (DMC Peacock Scissors)
5” Scissors for cutting felt (Fiskars Soft touch)
Flat Measuring Tape (Any Brand)
Milliner’s Sewing Needle 60mm (Dritz)
Collapsible needle 6.4 cm, 2.5” (Beadalon)
Water soluble fabric marking and/or quilter’s marking pencils (Dritz)
Bead Mats (Beadalon)
Size D Crochet hook ( Susan Bates White Plastic)
Instructions: (Quick notation, recommended reading; infographics with detailed diagrams are at the bottom of this post. )
1. Cut felt to 1 1/2” x 1”. Then draw the word “BE” in capital letters with the quilter’s pencil, with a double line thickness so that the letters have the look of being outlined without any fill color.
2. Sew Surface Satin Stitch with 2 strands of Embroidery Floss by locking a 4” tail in place with a knot on top of the felt. Keep this tail under the stitching at all times. Then take the needle and go from right to left from inner line of the B, to the outside line of the B. Then stitch the next stitch, a 1/16” away and go from left to right from the outer line of the B to the inner line of the B. Continue in the same manner around the letter B. After stitching the first part of this stitch, Fill in the open spaces by doing everything in reverse of what has been done before. Do the same for the letter E.
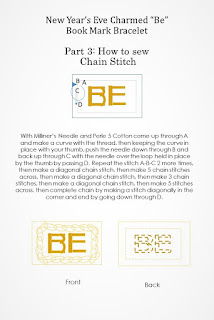
3. Sew Chain Stitch around the edge of the rectangle. To sew chain stitch, Come up through the back with Perle 5 Cotton and needle, then make a loop and hold the loop in place with your thumb. Then when the top of the chain is reached, go down through the felt and then up through the felt right above the widest part of the loop to lock the stitch in place. Continue around. Until there are 3 stitches per vertical edge, 5 stitches per horizontal edge, and one stitch per corner of the rectangle. At this point you may want to cut the corners off of the felt to make the shape more of an octagon shape. This is optional.
4. String Beads on Perle 5 cotton with collapsible needle. Start with the pearl, then 2 6/0 “E” Beads, then one crystal, then 2 6/0 “E” Beads, then one pearl, then then 1 6/0 “E” Bead, then one crystal, then then 1 6/0 “E” Bead...Repeat sequence until all beads have been strung onto the thread. Crochet beads into place with Single Crochet. To make single crochet, yarn over, pull up a loop, slide one bead down thread next to where stitch is being made, yarn over, pull up another loop, pull through both loops on hook. Continue with all the beads in this manner until the first stitch of the round, then slip stitch to the first stitch of the round by a yarn over and pulling through both loops on hook.
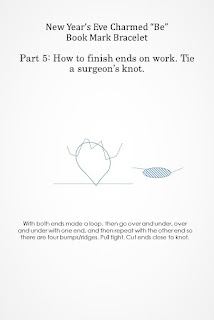
5. Tie all ends with surgeon’s knots. Interlace two threads together by creating two overhand ties with each end so that there are four ties in the loop made. Then pull tight. The knot looks like a flat slub. Cut knot close to ends. This can be done on all parts of the work where there are two ends to tie.
6. Make the Ribbon strap by cutting the ribbon to 8” long. Then fold under each end of the ribbon so that the ends are hidden. Then tack each fold in place with two running stitches per side of the ribbon. Then go through each stitch and create a double loop on each end by making a loop, sewing into place, and making one more loop the same size, and sewing into place. One loop is 2” and the other loop is 1 1/2”. End by sewing through between the two running stitches.
7. Finish the bracelet by crocheting single crochet stitches around each looped ring. On the larger loop, crochet around until the first stitch is reached and slip stitch to that stitch. On the second loop, crochet 5 stitches, then attach the charm so that the “BE" is facing upwards and the top of the word is against the loop. Slip stitch the charm through a top chained crochet from the center of the upper part of the rectangle. Then continue crocheting around the loop with single crochet and slip stitching to the first stitch of the round.
The bracelet can be worn around the wrist by folding the charm in half and sliding through the larger loop. This bracelet can also lie flat and be used as a bookmark.
Tutorial by Jessica B. Hensley aka Sketchwriterjess, translated from her hand drawn sketches.
More details about usage and making of the bracelet for sale can be found on the Free Tutorials page.
 |
| Learn how much easier and faster Satin Stitch can be when it is done the Surface stitching way. |
 |
| Surface Satin Stitch is a time saver as opposed to the regular Satin Stitch. |
 |
| Chain Stitch is a great way to make any fabric surface ready for crochet edging. |
 |
| Single Crochet makes adding beads to any edging quick and easy. It is also decorative. |
 |
| Tying a surgeon's knot with the ends of sewing and/or crochet ensures that the stitching will not come apart. |
 |
| Using sheer ribbon adds elegance and comfort to a bracelet. |
 |
| Crocheting around loops to make closures makes the closures strong. |
 |
| Even though this bracelet is made in 2016, it is a timeless classic to be made and worn from years to come. |
Would you like to see some other tutorials?


Thanks for post:
ReplyDeletechuyển phát hỏa tốc tới Síp
ship đồ tới Malta
chuyển phát tốc độ đi Malta
order ship hàng tây ban nha
order ship hàng đi hàn quốc